I already went through the customization of the XD87 (HS) keyboard via TMK using a layout from KLE in this blog post (along with general information about keyboard layout customization). The XD87 now has QMK support. That firmware is based on TMK, so it has the same principles but is a bit different in multiple aspects. Let’s look at them and see how to flash QMK on the XD87 (HS).
The difference between TMK and QMK as an end user aren’t really significant as they offer pretty much the same features. However, the path that leads to your flashed and ready keyboard is quite different.
Before going any further: Per key backlight is buggy (LEDs brightness isn’t steady). If bothers you, use the TKG firmware instead. See this blog post.
A note about the XD87 HS: HS is for hot swap, it’s the hot swap version of the XD87 that was released later. The main difference is the hot swap sockets (no kidding…) and a slightly less flexible layout. A reader of the blog confirmed that the version of QMK is compatible with the XD87 PCB.
Keymap
We’ll not be using KLE this time, nor TKG website. QMK has its own tool to generate keymaps and firmware which is pretty neat. It also gives access to internal QMK features.
Go to https://config.qmk.fm, choose the xd87 in the keyboard dropdown, and then choose your layout (ansi or iso). The full layout is for people that soldered the extra switches (1 between escape and F1, and 1 on each side of the ↑ key.
Once you picked your layout, start creating your keymap. Drag’n’drop a keycode onto a keyboard key, or select a key and click on the keycode. You should be able to get to this stage:
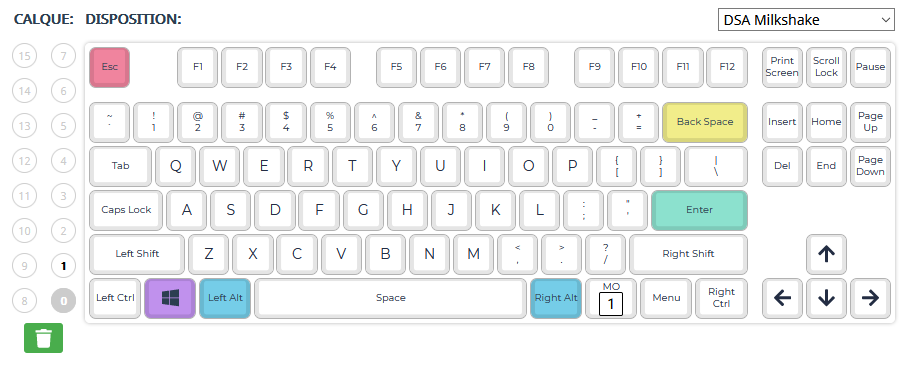
My layer 0 is really basic. The only “special” key is MO 1. It’s a momentary toggle to access the layer 1: hold the key to activate layer 1, release the key and you’re back to layer 0.
Now, onto the layer 1.
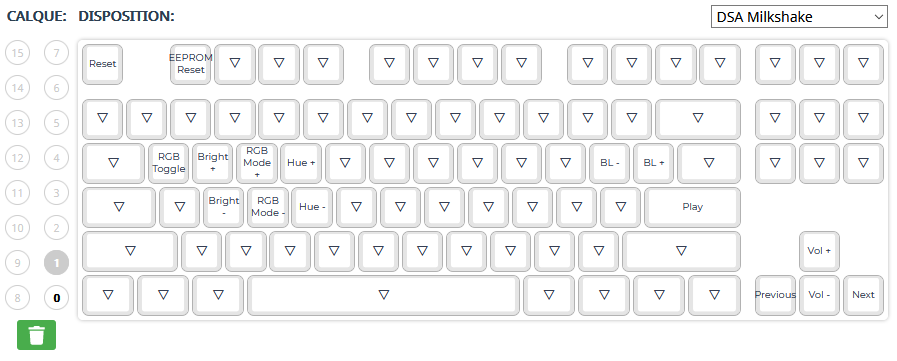
I use the arrow keys as media keys, enter as play/pause. BL+/- are for controlling the per key backlight, and on the other side, controls for RGB underglow. The escape key is Reset to flash the keyboard. The EEPROM Reset if for resetting the internal memory of the keyboard, in case something’s wrong. All the other keys are KC_TRNS, they act as “transparent” and when pressed, they fallback to the layer below.
Here’s my keymap json file, if you want to start from there: download the file (right click, save as…). You can import it in the layout tool so you won’t have to manually set all the keys.
Once you’re done, I suggest you download your keymap.json file as well. You’ll be able to re-import it later if you want to change it or even look at it if you forgot a key or anything.
Now click Compile. Wait for it to finish.
From here, there are 2 options:
- download the compiled firmware and flash it (download this file for use with QMK Toolbox)
- download the source (either keymap only and entire source code), compile it yourself and flash it
Flashing the keyboard
The QMK documentation has an entire section dedicated to keyboard flashing. That section doesn’t really explain how to flash a keyboard once you have the .hex file, it just tells you to use QMK Toolbox with no further information, or use the command line.
Flashing with QMK Toolbox
We’re going to use QMK Toolbox to do this, as recommended. Download it from the official release page: https://github.com/qmk/qmk_toolbox/releases (.exe for Windows, .app.zip for MacOS). It’s not compatible with Linux, sadly (see ticket on Github).
Open up the app. Click “Open” to select your keyboard firmware file (1). The firmware file is always a .hex file. Make sure the micro-controller is set to “atmega32u4” (2). Check the “Auto-Flash” box (3).
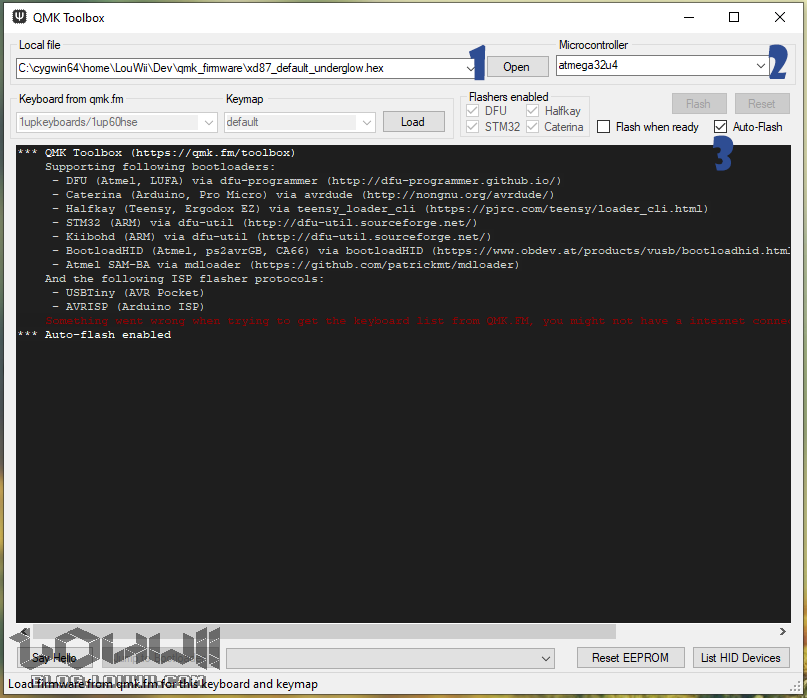
Now, reset the keyboard (make a short between the holes that are located between the delete and end keys). QMK Toolbox should detect that the keyboard is in flash mode and start the flashing process automatically.
Note: in my layout, I’ve set fn + Esc as a Reset key. This allows me to set the keyboard in flash mode without the need of shorting the 2 holes. Very handy.
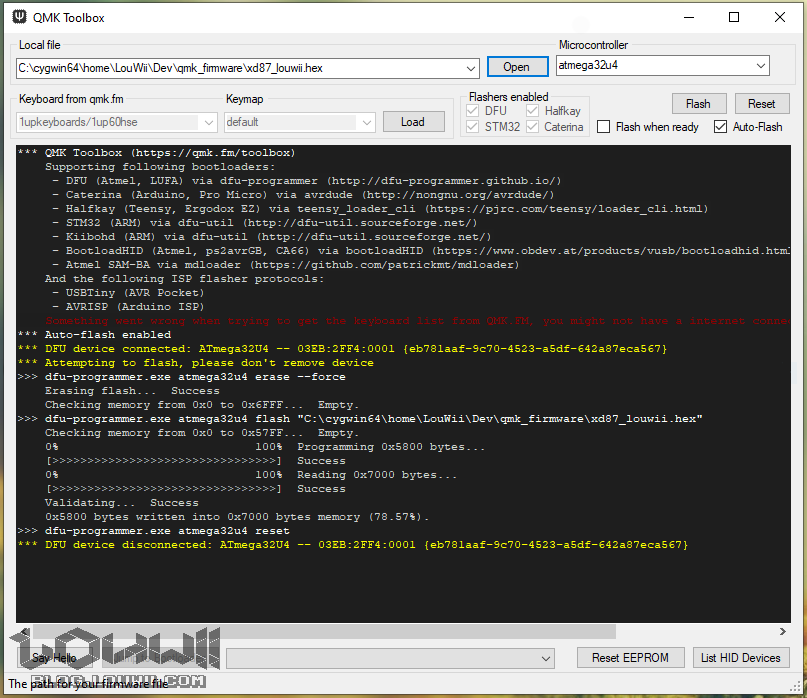
And that’s it, you’re ready to try your new layout. Happy flashing!
Flashing via the command line
From the QMK repo
If you have cloned QMK repo on your machine, then it’s pretty easy. I’ve done it using a Linux machine though, it’s way easier to get all the tools working.
First, you need to get all the commands and package to compile a QMK firmware via the command line. Checkout out the requirements list in QMK doc. And if you’re too lazy to click:
- build-essential
- gcc
- unzip
- wget
- zip
- gcc-avr
- binutils-avr
- avr-libc
- dfu-programmer
- dfu-util
- gcc-arm-none-eabi
- binutils-arm-none-eabi
- libnewlib-arm-none-eabi
- git
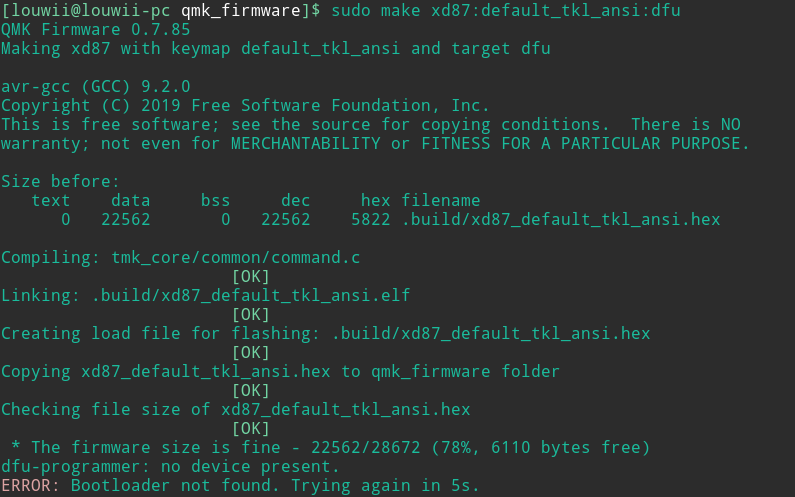
Once you have all of those installed, run the compile command with :dfu at the end. Something along those lines (modify it depending on your layout name):
|
1 |
sudo make xd87:default_tkl_ansi:dfu |
This will compile the firmware, then wait until it detects a device in bootloader mode, then it’ll flash it. So, you guessed it, run the command, wait for it to compile, switch your XD87 to bootloader mode, it should get flashed automatically, and you’re done. Easy peasy.
From .hex file via dfu-programmer
If you look at the command output in both QMK Toolbox and QMK compile + dfu flash, you can actually see what’s going on. We can easily reproduce that and use it to flash a .hex file on a keyboard.
First step is to erase the flash memory
|
1 |
dfu-programmer atmega32u4 erase --force |
then flash the firmware
|
1 |
dfu-programmer atmega32u4 flash myfirmware.hex |
and finally, reset the keyboard so it boots into the new firmware
|
1 |
dfu-programmer atmega32u4 reset |

Hello, do you know if the Hot Swappable edition of this board (XD 87 HS) https://www.aliexpress.com/item/33028638867.html?spm=2114.12010615.8148356.2.44013c88E3CWKS
uses the same PCB? Can I flash it following this guide?
Hmm, I think they should be the same, beside the hotswap sockets. I’m not 100% certain though as I never had the hotswap version of it. I’d be surprised if they changed the schematic.
I’ll make sure to use your guide when everything arrives home, thanks for your help 🙂
No problem. Let me know if it works so I can update the article.
Hey Louwii, Just tried this with my XD87 HS and I can excitedly announce that it does work using the steps that you outlined above!
Thanks a lot for letting me know! I’ve updated the article accordingly.
Hi, I have been running into trouble with the QMK Toolbox, whereby my keyboard is already connected to the OS system but it show that there are no devices available.
The reason why I am re-configuring my keyboard is that my backspace and \ keys are reversed and I was hoping for a solution.
Hope you have any tricks up your sleeves to solve this. Thanks xD
The toolbox doesn’t show anything even when you set your keyboard in bootloader mode via the reset pins?
Using your config I can’t seem to turn on underglow? I’m on the hotswap version
Hmm, not sure what’s wrong. I don’t have the hotswap version, so I can’t really check what’s up, it does work for me on the non hotswap PCB.
The person that confirmed the hotswap version worked with QMK might not have tested the underglow.
You did solder the LEDs properly, right?
If you are using config.qmk.fm, you won’t be able to use the underglow at the moment, because the default configuration for xd87 does not enable the underglow support. The only way to use the underglow is to compile the firmware yourself, adding RGBLIGHT_ENABLE = yes to rules.mk in your custom keymap, similar to how the default_underglow keymap does it.
Thanks man, I had the same issue, after flashing my xd87 with qmk toolbox the RGB stopped working. I then compiled the firmware myself and enabled RGB as you mentioned. it works perfectly now!
Could you go into more detail when you say “reset the keyboard (make a short between the holes that are located between the delete and end keys)”, as a noob, I have no idea how to do this. Thank you!
Check the TMK blog post there https://blog.louwii.com/2018/09/xd87-tkl-keyboard-kit-how-to-customize-the-layout-firmware-flash-keyboard/ It has a picture and some instructions.
Just an FYI, the glitchy backlight LED issue is fixed with newest firmware. Though, I think there’s still an issue with running underglow and backlight at the same time. That glitch is a different bug. But backlight alone (underglow disabled) works fine now.
And I wouldn’t use the firmware on VIA’s site. Think it’s the older glitchy one. If it still says: Last updated: 11 Nov 2020
Thanks debido666! Glad they finally fixed it. I’ll give it a try and update the post accordingly.
In Flashing with QMK Toolbox:
To able the DFU mode press both shift keys and pause. I’m try in my XD87HS and work fine. Thanks for the great content.
Thank you very much for this interesting guide, it is very appreciated.
I have bought a XD87 PCB for building a custom ALPS keyboard: I would like to exploit http://builder.swillkb.com/ to design the switches plate, but I have difficulties finding the raw data layout (there is not a preset in http://www.keyboard-layout-editor.com/).
Do you know if there is the raw data layout or directly the plate CAD somewhere?
Thank you again.
My best regards
That’s probably what you’re looking for? http://www.keyboard-layout-editor.com/#/gists/2049f040b07e656fac163936ae2b65eb That’s the “official” layout that was linked somewhere, I can’t remember exactly. Probably in the documentation that was provided by KPRepublic. You can always try to contact them, they usually answer.
You have been very kind, thank you very much.
My best regards
Thank you very much! Now everything works for me too! but one key doesn’t work and I don’t know why because I did everything like you did
Was the key working in the past? What key is it?
Thanks man, helped me out a lot 😀 <3